
congratulations!
If you are visiting this page, it’s likely you are a proud owner of a TinyPICO - congratulations!
If you don’t already own a TinyPICO, there are bunch of different places around the world you can grab one from…
We’ve put together this getting started guide to help you get familiar with your new TinyPICO, and showcase some of the main features of the board - including an FAQ covering some of the questions we were asked during the crowd funding campaign.
MAIN FEATURES
Your TinyPICO is pretty spec’d up! We’ve taken a lot of time and care to make it small, performant and as powerful and useful as possible, given our self imposed size constraints ;)
Although the TinyPICO uses a PICO-D4 chip from Espressif, it’s still the same powerful dual core ESP32 that you already might know and love. Just way smaller than you might be used to using!
That means you can do anything on the TinyPICO that you can do on any other ESP32 development board, within the constraints of the 14 GPIO exposed.
There are already hundreds of libraries and tutorials and videos online that cover everything from using an ESP32 to play music, serve web pages, output vision on a VGA screen, connect to RGB LED matrix panels and so much more. It’s a really well supported platform, that is growing even better every day.
HOOKIN IT UP
All you need to do to get started is to plug your TinyPICO into your computer using a Micro-B or USB-C USB cable, depending on which version you have.
Your TinyPICO ships with MicroPython pre-installed and has some hello world code on it that runs when you power it up.
Depending on when your TinyPICO was packed during the campaign, you will see one of 2 visual displays on the onboard RGB LED
A cycling rainbow
or
3 flashes of green, then a cycling rainbow
The 3 flashes in green are a RAM test result, indicating the extra PSRAM is working correctly. This extra visual indicator was added later in production to improve my testing speed on boards as they were being packed.
If you open a serial terminal with the TinyPICO plugged in, you will see some hello world info displayed after it boots. Here is an example of the output running on a Mac using screen in a terminal window:

The output will continue to display the PICO-D4 internal temperature every few seconds just to show you continued output so you know the TinyPICO is present.
NOTE: TinyPICO uses an external SerialUART chip to allow the ESP32 chip on board to communicate with your computer. You will need to make sure you have installed the correct SerialUART driver for you operating system to ensure your computer can detect and enumerate the serial port when the board is plugged in.
See this FAQ below to identify which driver you need to install.
MICROPYTHON
As mentioned above, your TinyPICO has MicroPython installed on it already, and the version it’s been flashed with is now v1.11 from the mainline repository + a bunch of fixes and improvements that have been implemented since v1.11 was released.
If you would like to update the version of MicroPython on your TinyPICO, you can follow the steps in the RE-INSTALLING MICROPYTHON on our coding examples page.
RE-INSTALLING OR UPDATING MICROPYTHON
Even though your TinyPICO ships with MicroPython installed, you can just connect it to the Arduino IDE and flash it with C++ code. If you do that, MicroPython will be erased from your board in the process of flashing it, so what if you want to get MicroPython back on there?
Or what happens if you just want to update to a newer MicroPython firmware?
There are 2 ways to get MicroPython onto your TinyPICO (or any other ESP32 development board):
Install the latest pre-built firmware
You can download and deploy the latest MicroPython firmware for your TinyPICO.
NOTE: The TinyPICO (ESP32) uses a specific set of command line parameters to flash MicroPython - check the download link above for the correct esptool command.
Compile MicroPython from source
If you are adventurous, you can download the Espressif IDF and MicroPython source and compile it yourself.
NEW TO MICROPYTHON?
I made some videos about what MicroPython is and how to use it on my YouTube channel. Here is the first video in the playlist:
If you are just looking for a way to get your code onto your TinyPICO, there are lots of ways to tackle this on the command line with apps like rshell & Ampy , but the code with mu IDE is one of the easiest, so I made a video about that too!
Arduino IDE
If you plan on using the Arduino IDE to program your TinyPICO, all you need to do is plug it in and flash it. MicroPython will be removed in the process and your TinyPICO will act just like any other development board you have used before.
The ESP32 Arduino Core is now available in the Arduino IDE boards manager - please make sure you are on the latest version.
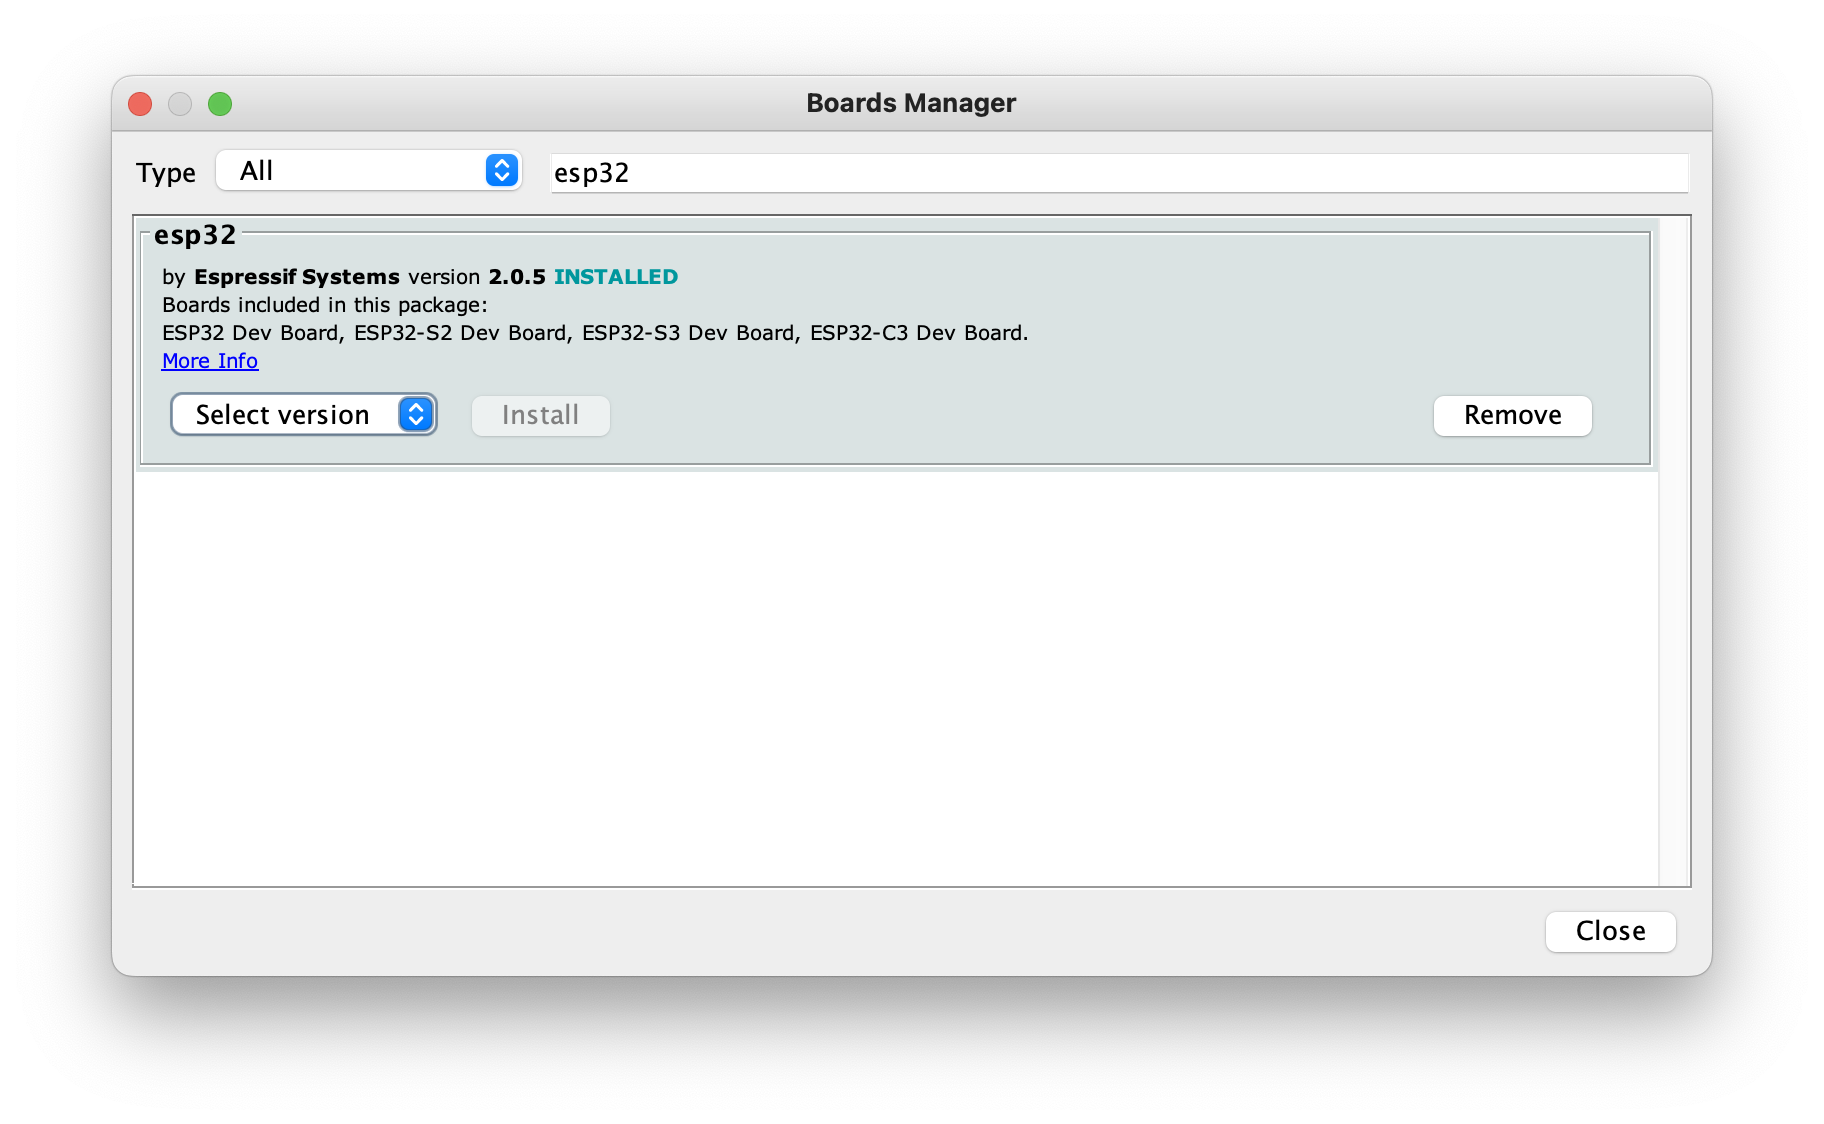
NOTE! If your TinyPICO is the first ESP32 development board you’ve used, remember to follow these steps in the Espressif docs to make sure you have installed everything you need before hand.
If everything has been installed correctly, you’ll need to select TinyPICO from the ESP32 boards list, and then you are set to go!

What do I do now?

Now all you need need to do is check out our coding examples to find out where to get your TinyPICO helper library and get started coding!!!!
ESP32 specific examples from Espressif are available in the file file menu in the examples folder.
power from BATTERY
Your TinyPICO comes with 2 types of JST connectors and the board has pads on the back where you can solder either of the connectors.
You can also connect a battery to the BAT & GND pins on the headers, if you don’t want to solder a JST connector on the board.
You can use any size, single cell Li-Po battery to power your TinyPICO. Obviously, the larger the mAH rating of the battery, the longer it will last.
To get optimal battery life, remember to shut down the RGB LED if you are not using it, or whenever it’s not lit up.
Please use LiPo batteries with charge protection included on them. Most hobby RC batteries do not have over-discharge protection, and if a battery discharges too much, it can damage it and it might never be able to hold a proper charge again.
NOTE: When connecting a battery to your TinyPICO, please check the polarity of the battery, as not every battery is wired the same way. The IC we use for charging does have in-built reverse voltage protection, but it’s better not to tempt fate!

FAQ
MY red power LED doesn’t light up when running off battery
MY ORANGE CHARGE LED BLINKS WHEN NO BATTERY IS CONNECTED
HOW FAST WILL MY battery charge?
sometimes my battery doesn't start charging when I plug it in
i’ve set my RGB led to Black/clear, but it’s still drawing a lot of current
what wifi range can i expect?
i’ve plugged my tinypico in but I can’t see it in the arduino ide or in /dev/
I get "Failed to connect to ESP32: Timed out waiting for packet header" when I try to flash my TinyPICO
my tinypico gets hot, especially when running on wifi, is that ok?
What voltage range can the 5V pin accept?
MY red power LED doesn’t light up when running off battery
That is by design! The power and charge LEDs and corresponding 2K resistors drain the battery, so they have been isolated to the 5V power domain, so they will only light up and draw power when the board is either being power by the USB plug, or by a 5V power source connected the 5V header pin.
MY ORANGE CHARGE LED BLINKS WHEN NO BATTERY IS CONNECTED
That is the correct behaviour! The charge IC can’t tell the difference between a full battery and no battery, so it cycles between trying to charge and not charge.
HOW FAST WILL MY battery charge?
The charge rate is fixed and set to 330mA based on the 3K3 charge resistor we used. This is far from the fastest you can charge a battery, but we’d rather err on the side of safety than be too aggressive.
sometimes my battery doesn't start charging when I plug it in
If you have 5V power connected to your TinyPICO before you plug your battery in, sometimes it might no start charging. Just unplug and re-plug in the 5V source and it should start charging correctly. This is a common issue with PMICs (Power Management ICs).
i’ve set my RGB led to Black/clear, but it’s still drawing a lot of current
The APA102 has a quiescent current of between 500uA and 1mA - that’s a lot! To counter this, we added a high side switch to the power of the APA, connected to GPIO13. So you not only need to set the APA to be black/clear, but you also need to pull GPIO13 low to cut power to the APA.
To make this easy for you, we added a simple helper function to both our MicroPython and Arduino TinyPICO libraries :-)
what wifi range can i expect?
This is really a tough question to answer as there are so many external factors that can affect WiFi performance, including construction of the building you are in, your network layout, power or RF noise in your area and where you are placing your TinyPICO.
All we can say is we spent a great deal of time tuning the matching network and the antenna implementation, to ensure it’s the best it can be. The rest is up to you and your environment.
i’ve plugged my tinypico in but I can’t see it in the arduino ide or in /dev/
The TinyPICO V2 uses a SiLabs CP2104 to connect the USB to the PICO-D4, so you need to make sure you have the driver installed. You can grab the latest drivers from from the SiLabs website.
The TinyPICO V3 uses a CH9102F to connect the USB to the PICO-D4, so you need to make sure you have the driver installed. You can grab the latest drivers from the WCH website.
Boards that ship with the CH9102F SerialUART chip have a table on the bag indicating this, but to identify which chip your board uses from the TinyPICO itself, boards with a Blue power LED use the CH9102F chip, and all others use the CP2104 chip.
Once the driver is installed (you may need a reboot your computer) the TinyPICO should appear in the Arduino IDE and as a device on your computer in the following formats:
macOS (TinyPICO V2): /dev/tty.SLAB_USBtoUART
macOS (TinyPICO V2): /dev/tty.wchusbserialXXX where x is the index of the USB device
Linux (TinyPICO V2): /dev/ttyUSBx where x is the index of the USB device
Linux (TinyPICO V3): /dev/ttyACM0
Windows: COMn where n is the port number assigned by Windows
I get "Failed to connect to ESP32: Timed out waiting for packet header" when I try to flash my TinyPICO
A few folks have seen this from time to time. 95% of the time it’s fixed by swapping the USB cable and or trying a different USB port on your computer. If that doesn’t fix the problem for you, please contact us and we’ll help you out.
My TinyPICO gets hot, especially when running on wifi, is that ok?
The Espressif ESP32-PICO-D4 is a very powerful SIP (System In a Package) for its size, and when running Wi-Fi continuously it gets hot, and because the TinyPICO is small, there is not a lot of place for heat to transfer to.
This is nothing to be alarmed about though. Even when running hot, everything is well within spec, so long as you follow some simple rules:
If you need to keep Wi-Fi active for long periods of time, like for a soft-ap setup, make sure you don’t enclose your TinyPICO in a small case or a case that has no air flow, and maybe even consider adding a small heatsink to the board to help with heat transfer.
Try to keep WiFi use short and sparse, if your project allows. Deep sleep your TinyPICO whenever you can, even when running off 5V as that will allow the ESP32 to cool down more then if it was fully awake.
If you need to put your TinyPICO in a case, add a small fan to pull the hot air out to keep the ambient temperature around the TinyPICO as low as possible. iI a fan is not possible, try to at least have air vents to let heat out.
What voltage range can the 5V pin accept?
The 5V pin on the TinyPICO is an in and out pin. As an input, it will accept a voltage range between 4.8V and 5.2V. Please do not connect any power source over 5.2V to the 5V pin and please do not connect your battery to the 5V pin. It is for a 5V power source only.
When USB power is connected, you will get approximately 4.9V out of the 5V pin. The voltage drop is due to the reverse USB power diode that allows the USB and 5V pin to be power inputs at the same time, and prevents back feeding power into the USB.
The use case for having both connected is when you want to power your TinyPICO from the 5V pin from an external 5V power source, but you also want to connect the USB to flash the board, or to get serial output.